

Yes, most swirl marks can be permanently removed. The method is abrasive polishing, which levels the clear coat so the base of each scratch sits flush with the surrounding paint. Waxes and fillers can mask the problem temporarily, but they do not fix it. Your immediate next step is to inspect the affected panels under angled daylight or a handheld inspection lamp, then run a small test spot with the mildest polish you have. Light surface swirls are usually DIY-friendly with careful hand or machine work; medium to deep swirls generally need a dual-action polisher and some experience, while the deepest cases call for a professional.
Key takeaways
Swirl marks can be permanently removed by levelling the clear coat with abrasive polishing, but the process requires progressive technique, a test spot, and proper protection afterwards to preserve the result.
| Point | Details |
|---|---|
| Polishing levels the clear coat | Abrasives remove a microscopic layer so scratches disappear; total lifetime removal should stay within 7–12 microns. |
| Start with the mildest method | Begin with the least aggressive pad and polish combination; step up only if the test spot shows no improvement. |
| Preparation is non-negotiable | Wash, iron-remove, and clay the paint before polishing; contaminated paint creates new scratches. |
| Protect immediately after correction | Apply a ceramic sealant or spray after polishing; freshly corrected clear coat is unprotected and vulnerable. |
| Diamondbrite for post-correction care | Diamondbrite’s pH-neutral shampoos and Ceramic Glaze help maintain corrected paint and reduce the risk of new swirls. |
Table of Contents
- Why do swirl marks appear on your car?
- How polishing removes swirl marks and what it costs your clear coat
- How hard is swirl removal, and should you DIY or call a pro?
- What tools and products do you actually need?
- Step-by-step: how to remove swirl marks safely
- Common problems after polishing and how to fix them
- How to keep swirls from coming back
- A note on progressive polishing and the test-spot habit
- Diamondbrite products for protecting your corrected paint
- Sources
- FAQ
Why do swirl marks appear on your car?
Swirl marks, known in professional detailing as wash-induced micro-scratches, are almost always caused by contact with abrasive surfaces during cleaning. The most common culprits are:
- Washing with a dirty or gritty mitt that drags particles across the paint
- Using a single bucket of water, which redeposits grit with every rinse
- Automatic brush car washes, where stiff bristles carry debris from the previous vehicle
- Drying with a rough or dirty towel, especially at speed
- Wiping dust from dry paint with a cloth or sleeve
Under light, swirl marks appear as fine circular or spider-web patterns that scatter and fragment reflections. The best way to check is to hold a torch or inspection lamp at a 30–45° angle to the panel in a shaded area, or take the car into natural daylight and look across the surface rather than straight at it. Dark and black paint reveals swirls most readily because the contrast between the scattered light and the deep background is so sharp. On lighter colours, the same damage is present but far harder to see until you polish and realise how much clarity you have recovered.
How polishing removes swirl marks and what it costs your clear coat
Polishing works by levelling the clear coat. An abrasive compound or polish contains microscopic cutting particles that remove a thin layer of clear coat, bringing the surrounding paint down to the depth of the scratch so the defect disappears. The scratch is not filled; it is erased by making everything around it the same height.
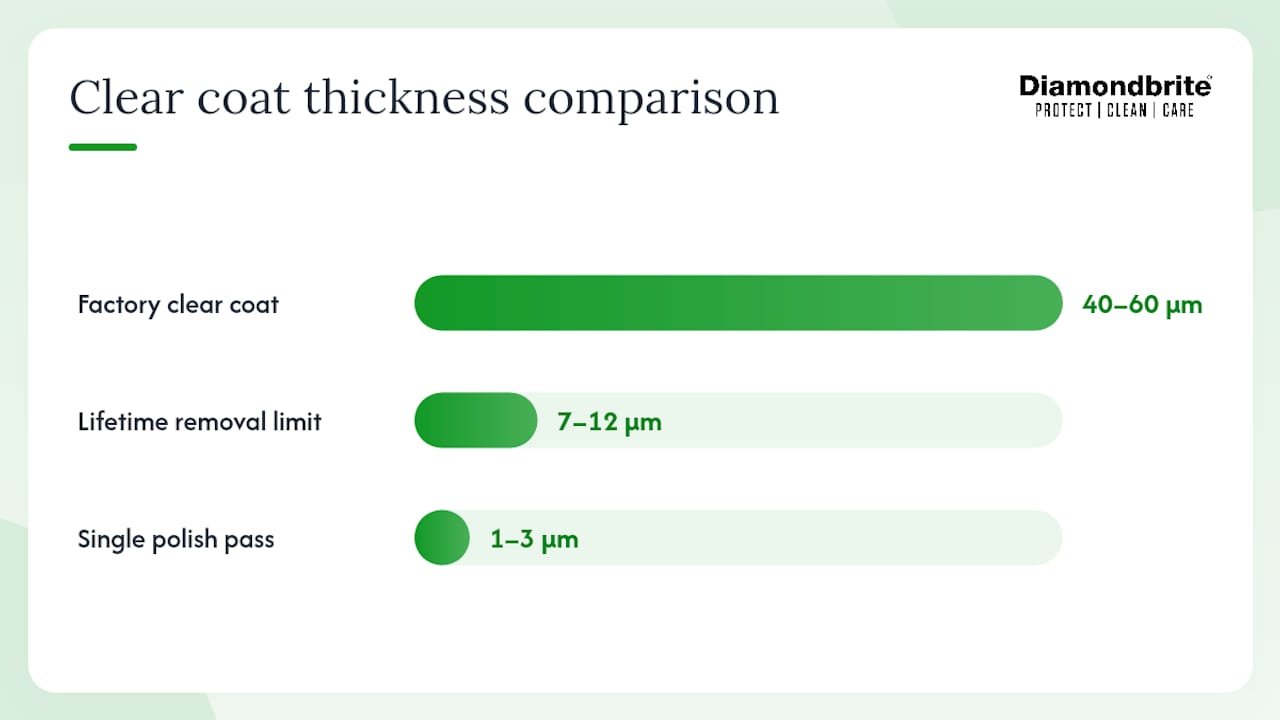
The trade-off is that clear coat is finite. According to CarCareTruth, experts advise limiting total clear coat removal to roughly 7–12 microns across a vehicle’s lifetime. To put that in context, a typical factory clear coat is 40–60 microns thick, and a single machine polish pass removes approximately 1–3 microns.
| Clear coat layer | Typical thickness |
|---|---|
| Factory clear coat (total) | 40–60 microns |
| Recommended lifetime removal limit | 7–12 microns |
| Single machine polish pass (approx.) | 1–3 microns |
The only way to know your exact remaining margin is a paint-depth gauge, a tool professionals use before any correction work. Without one, you are estimating, which is why the test-spot habit matters so much.
Safety checklist before you start:
- Always test-spot on a small, inconspicuous area first
- Begin with the mildest product that might work; step up only if needed
- Monitor pad temperature; a hot pad signals too much pressure or too many passes
- Avoid repeated passes over the same spot without checking progress
- Stop immediately if you see colour change, a dull haze that does not refine out, or a change in surface texture
Washdoctors note that different paint systems and clear coat thicknesses respond very differently to polishing, which is why inspection and measurement before correction is standard professional practice.
How hard is swirl removal, and should you DIY or call a pro?
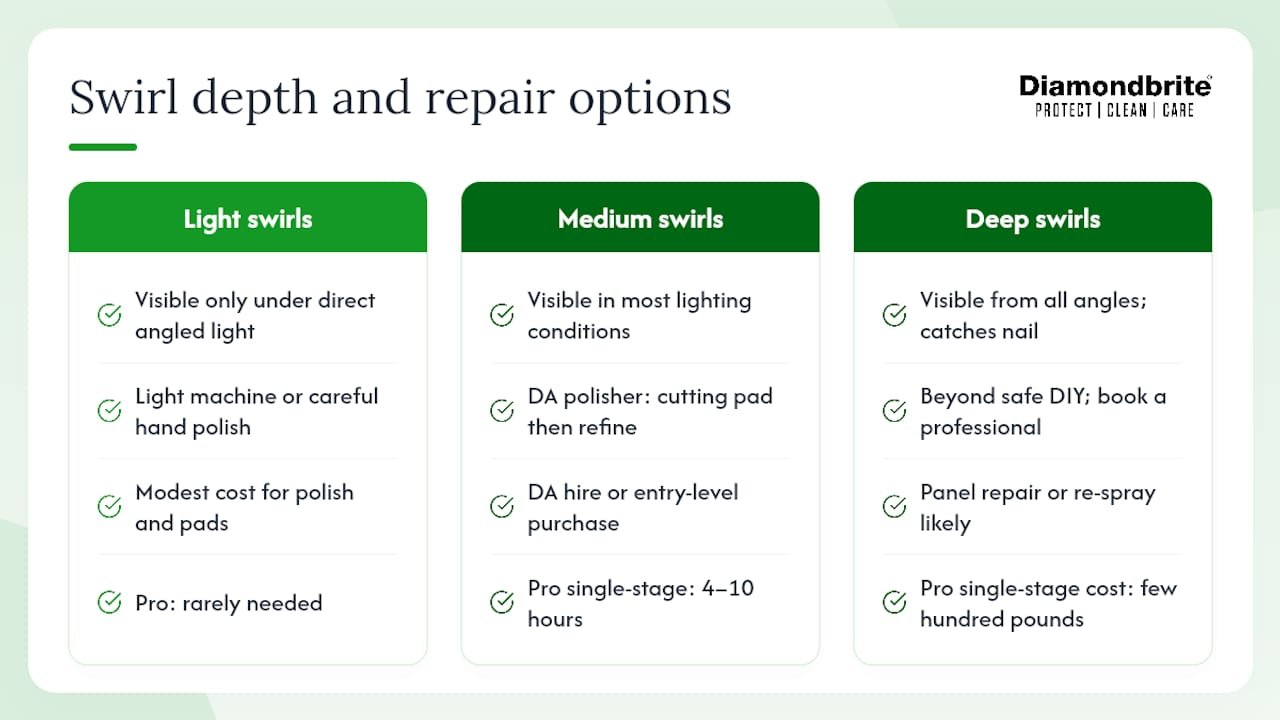
The answer depends almost entirely on swirl depth. There are three practical bands:
Light swirls are visible only under direct light at a specific angle. A light machine polish or careful hand polishing with a finishing product can usually resolve these at home. Budget roughly a modest amount for a quality polish and a set of applicator pads.
Medium swirls are visible in most lighting conditions and may show a slight web pattern across the whole panel. These need a dual-action (DA) polisher with a cutting pad and a medium-grade polish, followed by a refining pass. A DA polisher can be hired from most tool-hire shops for a moderate daily rate, or purchased at an entry-level price suitable for beginners. Washdoctors confirm that a professional single-stage machine polish typically takes 4–10 hours depending on vehicle size and paint condition.
Deep swirls and scratches that are visible from all angles, catch a fingernail, or fail to improve after a test spot with a medium polish are beyond safe DIY territory. Professional single-stage correction in the UK typically costs a few hundred pounds for a small car; multi-stage correction costs significantly more. When a test spot shows no improvement, or when you see colour change or a haze that will not refine out, stop and book a professional.
A quick decision rule: if you can feel the scratch with a fingernail, polishing alone will not fix it. That depth has broken through the clear coat, and panel repair or re-spray becomes the realistic path.
What tools and products do you actually need?
Machine options
A dual-action (DA) polisher is the safe default for most car owners. Its oscillating and rotating motion distributes heat and abrasion evenly, making it far harder to burn through paint than a rotary machine. Rotary polishers cut faster but generate concentrated heat; in inexperienced hands, they can cut through a panel edge or thin spot in seconds. If you are new to machine polishing, start with a DA.
Pad and polish matching
Pads come in three broad grades: cutting (foam or microfibre, more aggressive), refining (medium foam), and finishing (soft foam). Match the pad to the polish: a cutting pad with a medium polish removes more material than a finishing pad with the same product. Starting with the least aggressive combination and stepping up only if the test spot does not correct the defect is the standard professional approach.
The rest of your kit
- Two buckets with grit guards (one for wash solution, one for rinse)
- pH-neutral car shampoo and plush microfibre wash mitts
- Iron remover spray and a clay bar or clay mitt for decontamination
- Isopropyl alcohol (IPA) panel wipe to inspect true correction after polishing
- Quality microfibre drying towels (waffle-weave or plush)
- Masking tape to protect rubber seals and plastic trim at panel edges
- Gloves and eye protection when working with compounds and IPA
Pad care: prime new foam pads with a small amount of polish before use, clean them between panels with a pad-cleaning brush or compressed air, and replace any pad that feels hard, glazed, or contaminated. A dirty pad creates new scratches rather than removing old ones.
Step-by-step: how to remove swirl marks safely
Inspect the paint. Under angled daylight or a lamp at 30–45°, identify which panels are affected and estimate swirl depth. Note any areas where paint looks thin or where previous polishing may have occurred.
Wash the car thoroughly. Use the two-bucket method: one bucket with pH-neutral shampoo, one with clean rinse water, both fitted with grit guards. Wash with a clean plush mitt using straight, overlapping strokes rather than circles. A single bucket of dirty water acts like liquid sandpaper and is the primary cause of hand-wash swirls.
Decontaminate the paint. Spray an iron remover over the panels and allow it to dwell until it turns purple, then rinse. Follow with a clay bar or clay mitt lubricated with a quick-detailer spray, working panel by panel. Polishing contaminated paint risks creating additional scratches, so this step is not optional.
Dry the car. Use a clean, plush drying towel or a filtered air blower. Pat rather than drag across the surface.
Mask panel edges. Apply masking tape along door shuts, rubber seals, and plastic trim. Edges are where cut-through happens first.
Run a test spot. Choose a 30 x 30 cm area on the worst-affected panel. Apply your chosen polish with the appropriate pad, work it in, and inspect under the lamp after wiping off residue with an IPA wipe. If the swirls are reduced, continue. If not, step up one grade of pad or polish and test again. If the test spot shows haze that will not refine out, colour change, or a change in texture, stop.
Polish panel by panel. Work one panel at a time. Prime the pad, apply a few pea-sized drops of polish, spread at low speed (setting 1–2 on a DA), then increase to working speed (setting 3–4). Use moderate, consistent pressure and work in overlapping passes. Allow the polish to break down (it will turn clear or near-transparent) before wiping off with a clean microfibre cloth.
Refine. After cutting, switch to a finishing pad with a light finishing polish and make one or two passes over the panel to remove any light haze left by the cutting stage.
IPA wipe and inspect. Wipe the panel with a diluted IPA solution (roughly 1:4 IPA to water) to remove any oils from the polish. This reveals the true correction under the lamp. Any remaining swirls are now visible without the masking effect of polish oils.
Protect the paint. Freshly corrected clear coat is unprotected. Apply a quality sealant, ceramic spray, or wax to seal the surface. Tiki Details note that protection reduces the ease with which dirt abrades the surface and makes future cleaning easier.
Pro Tip: Work in a shaded area or indoors whenever possible. Direct sunlight heats the panel and causes polish to dry too quickly, reducing its effectiveness and making it harder to remove. If you must work outside, keep sections small (30 x 30 cm) and move quickly.
Common problems after polishing and how to fix them
Haze after buffing. A light haze after polishing is almost always residual polish oils or a cutting pad that was too aggressive for the final stage. Wipe the panel with a diluted IPA solution, then make one pass with a finishing pad and a light finishing polish. If the haze persists, the cutting stage may have left micro-scratches that need a dedicated refining step.
Swirls still visible after polishing. The most common causes are: the polish or pad combination was not aggressive enough for the depth of the swirl; the polish was not worked long enough to break down properly; or the paint was not fully decontaminated before polishing. Re-clay the panel, step up one grade, and repeat the test spot. Community detailers note that lighter cutting products are safer for DIY but may not shift medium-depth swirls without a machine.
New marring after polishing. This usually means a contaminated pad. Inspect the pad for embedded grit or dried polish, clean or replace it, and re-polish the affected area with a fresh pad.
Mini diagnostic checklist:
- Haze that refines out: cutting stage residue, fix with a finishing pass
- Haze that will not refine out: possible cut-through or too-aggressive compound, stop and assess
- Swirls unchanged: insufficient abrasion or contaminated surface, re-prep and step up
- New scratches: contaminated or glazed pad, replace pad immediately
- Colour change or bare metal visible: clear coat loss, panel repair is now required
When a scratch catches a fingernail or is visible from every angle regardless of light direction, no amount of polishing will fix it safely. That is the point at which re-spray or panel repair is the only sensible option.
How to keep swirls from coming back
Correction is only half the job. The washing and maintenance habits you adopt afterwards determine how long the results last.
Prevention checklist:
- Use the two-bucket method with grit guards on every wash
- Choose a pH-neutral shampoo and a plush, clean microfibre mitt
- Rinse the mitt in the clean-water bucket after every panel
- Dry with a clean, soft drying towel using straight strokes, not circles
- Never wipe dust from dry paint with a cloth; use a waterless wash product on lightly soiled panels only
- Avoid automatic brush car washes entirely
- Rinse the car after motorway driving or heavy contamination before it dries on
Protection cadence: a quality ceramic sealant or spray ceramic applied after correction typically lasts 3–6 months with regular washing. Top it up on that schedule and you build a durable shield that makes dirt easier to rinse away and reduces the friction that causes micro-scratches in the first place. A traditional wax needs refreshing more frequently, roughly every 6–8 weeks in UK conditions.
Quick daily do/don’t:
- Do use a waterless wash on lightly soiled panels between full washes
- Do rinse bird droppings and tree sap off promptly; both etch clear coat quickly
- Do not wipe a dusty panel dry with any cloth
- Do not use washing-up liquid, which strips protective coatings and leaves paint unprotected
A note on progressive polishing and the test-spot habit
The single most common mistake in DIY swirl removal is reaching for the most aggressive product first. It feels efficient, but it costs you clear coat you cannot get back, and it often leaves a haze that requires a second correction stage to fix. Progressive polishing, starting with the mildest combination that might work and stepping up only when the test spot proves it is necessary, is not a cautious amateur’s approach. It is what professional detailers do on every job.
The test spot is equally non-negotiable. Paint thickness varies between panels, between manufacturers, and even between different production runs of the same model. A test spot on the worst-affected panel tells you what the paint will tolerate before you commit to the whole car.
One tip that does not get enough attention: if you are working with a DA polisher and the pad starts to feel warm to the touch after a single panel, reduce your working speed by one setting or switch to a smaller backing plate. Smaller plates generate less heat at the same RPM, which gives you more control on tight curves and around edges where cut-through risk is highest.
Diamondbrite products for protecting your corrected paint
Once your paint is corrected, protecting it well is what makes the effort worthwhile. Diamondbrite’s ceramic-infused product range is built for exactly this stage: keeping freshly polished paint clean, protected, and free from the micro-abrasion that causes swirls to return.

A pH-neutral ceramic shampoo is the right choice for every wash after correction. It cleans without stripping the sealant layer, so your protection lasts longer between top-ups. For the sealant itself, Diamondbrite’s Ceramic Glaze builds a durable, hydrophobic layer that makes dirt sheet off rather than bond to the surface, reducing the friction that causes new swirls during washing. If your car has a matte finish, the matte paint ceramic coating guide covers the specific products and techniques that work safely on non-gloss clear coats. Browse the full range and pick up everything you need at the Diamondbrite online shop.
Sources
The following resources offer reliable step-up guidance for deeper reading on swirl removal and paint correction. They are listed as references, not endorsements of any third-party brand.
- How to Remove Swirl Marks (By Hand or Machine) · CarCareTruth
- Why Removing Swirl Marks and Micro-Scratches Requires More Skill Than You Think | Washdoctors
- What Are Swirl Marks and How Do You Remove Them? · Tiki Details
- Dealing with swirl marks and paint imperfections · Independent Paint Supplies Ltd
FAQ
Can swirl marks be permanently removed?
Yes. Abrasive polishing levels the clear coat so the scratch disappears rather than being filled or masked. The result is permanent unless new swirls are introduced by poor washing technique.
Is it possible to remove swirl marks by hand?
Light swirls can be reduced or removed by hand using a finishing polish and a foam applicator pad, though machine polishing delivers more consistent results on medium or heavy swirl patterns.
Does T-Cut remove swirl marks?
Traditional cutting compounds such as T-Cut can reduce light swirls, but community detailers note they carry a higher risk of leaving haze or additional marring if not followed by a refining stage. A lighter, dedicated swirl-remover polish is generally safer for DIY use.
Why do I still have swirls after buffing?
The most likely causes are insufficient abrasion for the swirl depth, polish that was not worked long enough to break down, or paint that was not fully decontaminated before polishing. Re-clay the panel, step up one grade of pad or polish, and repeat the test spot.
