

Found mould on your seats or carpet? Isolate the car, open the windows or doors to ventilate, and never dry-brush or vacuum the affected area, as that scatters spores through the cabin. The core approach is simple: stop the moisture source, clean with a proper anti-fungal product, then dry the interior completely. Small patches on hard surfaces are usually a safe DIY job; large areas, repeat regrowth, or anyone with asthma in the household means it’s time to call a specialist.
TL;DR:
- Large or persistent mould issues, especially near vents or on fabric, require professional cleaning and inspection to locate hidden sources of moisture.
- Proper safety measures include wearing protective gear, ventilating the car, and avoiding vacuuming or dry-brushing to prevent spores from spreading.
- Thorough drying using extraction machines, fans, and dehumidifiers is crucial to prevent mould regrowth, particularly after flooding or water ingress.
- Regular maintenance habits like removing wet items promptly, checking seals, and using anti-mould interior products help prevent mould from returning.
- Avoid bleach and generic aerosols inside the car; instead, rely on proven fungicidal and enzyme-based cleaners designed for automotive surfaces.
Table of Contents
- How to assess mould damage and stay safe before you start
- Step-by-step mould removal for seats, trims, and carpets
- How to dry a car interior completely after cleaning
- Preventing mould from coming back
- When to call a professional for mould removal
- Diamondbrite’s advice on caring for your interior after mould removal
- Safe disposal of mould-contaminated materials
- A practical checklist worth keeping in the glovebox
- Keep your interior protected after the clean-up
- Sources
- FAQ
How to assess mould damage and stay safe before you start
Before you touch anything, work out what you’re dealing with. A small patch on a hard surface, such as a plastic door card or dashboard trim, is generally manageable yourself. Anything spreading across a seat, the carpet, or the headliner, or mould that keeps returning after cleaning, indicates an unresolved moisture problem.
Trace the source before you clean. Common culprits include a leaking door seal, a blocked sunroof drain, soaked floor mats left in after a wet walk, condensation from short journeys, or a boot seal that’s perished. Cleaning without fixing the source just buys you a few weeks before the mould’s back.
Safety comes first. Government guidance on damp and mould recommends addressing the moisture source and using appropriate cleaning products, and the same logic applies inside a car.
- Wear a mask, gloves, and eye protection before disturbing any mould.
- Keep internal doors closed and windows cracked to stop spores drifting into your home.
- Never dry-brush or vacuum with a standard household machine. Both actions launch spores into the air.
- If anyone in the household has asthma or a weakened immune system, NHS guidance advises against them tackling mould removal directly.
Pro Tip: Take a photo of the affected area before you clean. If the mould returns within a fortnight in the exact same spot, that’s your clearest sign the moisture source hasn’t been fixed.
Step-by-step mould removal for seats, trims, and carpets
Once you’ve traced the moisture and geared up properly, work through the interior in a set order rather than jumping between surfaces.
- Prepare the space. Remove loose items, floor mats, and anything soaked. Work with doors open in a well-ventilated area, ideally outdoors, and keep pets and children away.
- Treat hard surfaces first. Dashboards, door cards, and plastic trims respond well to a fungicidal wash or an enzyme-based cleaner applied with a damp microfibre cloth. Let it sit for the manufacturer’s recommended contact time, then wipe and rinse with a second clean, damp cloth.
- Move to fabric seats and carpet. Apply an enzyme cleaner and agitate gently with a soft brush, working in small sections. Aggressive scrubbing risks pushing spores deeper into the weave rather than lifting them out.
- Extract, don’t soak. A wet/dry extraction machine pulls moisture and loosened mould out of upholstery far more effectively than a hose-down, which just adds to the damp problem you’re trying to solve.
- Finish the headliner and belts with care. These are the most delicate areas in the cabin. Light surface cleaning and, where possible, professional extraction protect the adhesive backing on headliners and the fibre integrity of seat belts, since heavy scrubbing can delaminate fabric or weaken stitching.
Bleach and generic aerosol mould sprays are usually a poor choice inside a car. Bleach can discolour fabric and pit chrome trim, and most off-the-shelf aerosols aren’t designed for the tight, poorly ventilated space of a cabin. Government advice after flooding treats’ vehicle interiors much like soft furnishings in the home: proprietary mould removers handle small patches, but extensive contamination needs a specialist.
Kit worth having on hand:
- Microfibre cloths (several, colour-coded for hard surfaces versus fabric)
- A soft-bristled detailing brush
- A wet/dry extraction machine or a rental steam-extraction unit
- Enzyme-based upholstery cleaner and a fungicidal hard-surface wash
Skip the standard household vacuum unless it has a sealed HEPA filter. Without one, you’re recirculating the exact spores you’re trying to remove straight back into the cabin air.
How to dry a car interior completely after cleaning
Damp cleaning is only half the job. Mould returns fast in a car that’s been cleaned but not properly dried, because the same trapped moisture that grew it the first time is still sitting under the surface. Steam can help lift mould, but without immediate extraction it risks driving moisture deeper into the padding rather than removing it.
Work through drying methodically:
- Extract as much water as possible with a wet/dry machine before you rely on air alone.
- Run fans and, where safe, the car’s own heater with the windows slightly open to push humid air out rather than trapping it.
- Position a small dehumidifier or desiccant sachets in the footwells overnight. Independent dehumidifier testing from Which? confirms a correctly sized unit meaningfully speeds drying and cuts the odds of regrowth.
- Check for trapped moisture with a simple test: press a piece of clear food wrap onto the carpet or seat overnight and look for condensation underneath the next morning.
Pro Tip: If the smell of damp lingers more than 48 hours after cleaning, moisture is still trapped somewhere. Keep drying rather than adding more cleaning product.
If the car has suffered flooding, an electrical soak, or a persistent damp smell that won’t shift, contact your insurer and a professional before doing anything further.
Preventing mould from coming back
A car that stays dry rarely grows mould again, so prevention is mostly about habit rather than product.
Build these into your routine:
- Take wet coats, umbrellas, and gym kit out of the car straight after every journey rather than leaving them to dry in the footwell.
- Crack a window on dry days to let condensation escape, particularly after short commutes in cold weather.
- Wipe down the inside of the windscreen and rear window regularly. That’s where condensation collects fastest.
- Twice a year, check door and boot seals for perishing, and clear sunroof drainage channels of leaves and debris.
- Inspect the cabin air filter. A clogged one can trap moisture and become a mould source of its own, so consider a professional air-conditioning clean if musty odours persist despite everything else being dry.
A small dehumidifier or desiccant sachets left in the car overnight during damp months help enormously, and a light anti-mould interior spray on trims after any water exposure adds another layer of protection. Government guidance is clear that controlling moisture, not just cleaning, is the long-term fix.
When to call a professional for mould removal
Some jobs genuinely aren’t DIY territory. Call a specialist when mould covers a large area of carpet or upholstery, when it keeps returning despite proper cleaning and drying, or when the cause is water ingress from a failed seal or structural fault you can’t access yourself.
Health matters just as much as the size of the job. NHS advice on damp and mould is direct: people with asthma or weakened immunity face a higher health risk, and professional remediation limits their exposure while reaching hidden mould in vent ducts or under carpets that’s easy to miss at home.
A professional visit typically includes:
- An inspection to locate every affected area, including under trims and inside vents.
- Targeted disinfection using commercial-grade fungicidal products.
- Steam or extraction cleaning for upholstery and carpet.
- Anti-fungal fogging for air vents and the air conditioning system, where mould has spread into the ventilation.
Before booking, ask what method they use, what personal protective equipment their team wears, and how they’ll dispose of contaminated waste. A reputable operator will answer all three without hesitation.
Diamondbrite’s advice on caring for your interior after mould removal
Once mould is gone and the cabin is dry, the surfaces you’ve just cleaned need gentler ongoing care, not harsh chemicals that undo the work. Diamondbrite’s interior product range is built around pH-appropriate formulas rather than bleach-based products, which matters because bleach and aggressive solvents strip protective coatings and discolour trim over time.
A few habits worth adopting:
- Choose pH-balanced interior cleaners over bleach or generic multi-surface sprays on dashboards and door cards.
- Use odour-neutralising products rather than heavy air fresheners, which mask a damp smell instead of resolving it.
- Follow a dashboard cleaning routine that avoids soaking trims, keeping moisture from working back into seams and vents.
Treat the post-mould clean as a reset point for your interior maintenance, not a one-off fix.
Safe disposal of mould-contaminated materials
Getting rid of contaminated items properly matters just as much as the cleaning itself, because a bin bag full of mouldy carpet underlay or soaked floor mats left sitting in a garage keeps releasing spores long after you’ve finished wiping down the cabin.
Bag anything porous that mould has soaked into, such as floor mats, seat covers, or carpet underlay, in a sealed plastic bag before it leaves the car. Sealing it at the point of removal, rather than carrying it loose through the house or garage, is what actually stops spores spreading to other spaces.
Wipe down any tools, brushes, or cloths you’ve used with a disinfectant solution, or dispose of single-use items like gloves and masks in the same sealed bag as the contaminated material. Household waste collections accept small amounts of mould-affected fabric in general terms, but check your local council’s guidance if you’re disposing of a large quantity, such as a full set of carpets after flooding, since some councils classify bulk contaminated waste differently.
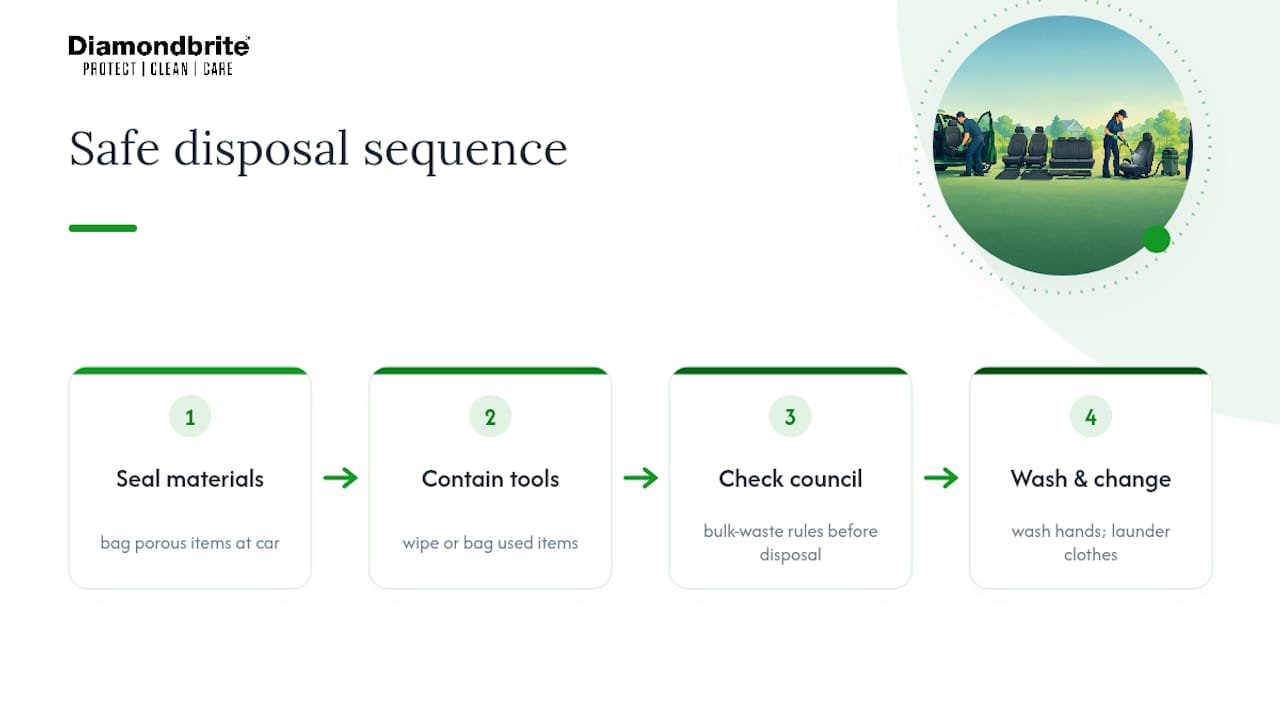
Wash your hands and any exposed skin thoroughly after handling contaminated materials, even when you’ve worn gloves throughout. Change out of any clothing that came into direct contact with mould before it touches other soft furnishings, and wash it separately on a hot cycle where the fabric allows. This last step gets overlooked more than any other, and it’s often the reason spores turn up somewhere unexpected days after the job’s supposedly done.
A practical checklist worth keeping in the glovebox
Most cabin mould comes down to one of three habits: wet mats left in too long, short journeys that never fully dry the windows, or a seal nobody’s checked in years.
Immediate checklist: isolate the car, ventilate it, remove anything wet, clean with the right product, then dry completely before you call the job done.
— Will
Keep your interior protected after the clean-up
Getting mould out is only step one. The bigger win is stopping it coming back, and that’s where the right maintenance products earn their keep.

Diamondbrite’s Automotive Interior range is built for exactly this stage: pH-appropriate cleaners and odour-control formulas designed to protect the surfaces you’ve just brought back from mould damage, without the harsh chemicals that strip trims or fade fabric over time. Where a bleach-based supermarket spray might solve today’s smell and create tomorrow’s discoloured dashboard, some interior products are formulated specifically for automotive surfaces, helping protect materials recently restored. If odours persist after cleaning, the car odour removal guide walks through diagnosing the source before you reach for another spray. Head to the Diamondbrite shop to browse the interior range and pick a starter kit that matches what your cabin actually needs.
This article is general information, not a substitute for advice from a qualified doctor. Consult a qualified healthcare professional about your own circumstances before acting on anything here.
Sources
FAQ
Does WD-40 remove mould from silicone seals?
WD-40 isn’t designed as an anti-fungal product, so it won’t kill mould spores even if it lifts surface staining temporarily. Use a proper fungicidal wash on silicone door seals, then dry the area fully, as trapped moisture in the seal is usually what causes mould.
Can a car with mould be saved?
Yes, in most cases. Hard surfaces and lightly affected fabric respond well to fungicidal cleaning and thorough drying, while government guidance on flooding notes that only extensive contamination, such as after deep water ingress, typically requires full replacement of porous materials like carpet underlay.
What kills mould in cars?
Fungicidal washes and enzyme-based cleaners kill mould on contact when given the correct dwell time, followed by thorough drying to stop it returning. Bleach and generic aerosols are best avoided inside a cabin, since they can discolour trim and don’t address the underlying moisture that let mould grow in the first place.
Can black mould be removed from a car?
Small patches of black mould on hard surfaces can usually be cleaned with a proprietary mould remover and thorough drying. Larger or recurring black mould, especially anywhere near vents or the headliner, is a case for professional remediation, particularly if anyone in the car has asthma or a compromised immune system.
How much does professional car mould removal cost?
Diamondbrite doesn’t offer mould removal services directly, so pricing depends on the specialist you contact and the extent of the contamination. Diamondbrite’s own interior care products are aimed at the maintenance stage after professional or DIY removal, with current prices listed on the shop itself.
