

Yes, ceramic protection is worth it for most motorhome owners, provided the surface is properly prepared beforehand. It saves hours of scrubbing off bug splatter and diesel film, and it slows the sun-bleaching that dulls GRP panels within a few seasons. Weekend tourers do well with a quality DIY product like Diamondbrite’s ceramic range; owners with larger, mixed-material coachwork usually get better long-term results from a professional application.
TL;DR:
- Applying ceramic coating requires thorough decontamination and, ideally, professional correction of oxidation and scratches to ensure long-lasting results.
- Costs vary widely, from about £30 for DIY kits to over £1,500 for premium professional services with full paint correction and multiple-year durability.
- Painted panels and gelcoat are suitable surfaces for ceramic coatings once properly polished, but plastics and trims generally need specialized formulations or should be left untreated.
- Regular maintenance using pH-neutral shampoos and annual decontamination significantly extends the coating’s lifespan, which can range from months on DIY products to several years with professional application.
- Owners in harsher environments or seeking a flawless finish should consider professional coating packages and disciplined maintenance routines to maximize durability and appearance.
Table of Contents
- What does motorhome ceramic protection actually do?
- How is ceramic coating applied to a motorhome?
- How much does motorhome ceramic protection cost?
- Which motorhome surfaces are safe to coat?
- How do you make a ceramic coating last?
- What’s the honest verdict for different motorhome owners?
- Where to buy Diamondbrite ceramic products for your motorhome
- Sources
- FAQ
What does motorhome ceramic protection actually do?
A ceramic coating changes the surface at a molecular level rather than just sitting on top of it like traditional wax. Specialist protectants, sometimes marketed as “liquid glass,” bond to the paint or gelcoat and form an almost invisible hard shell that resists dirt, tar, and UV degradation while making the surface far easier to rinse clean, according to Practical Motorhome. That shell is what gives you the beading effect you’ll have seen on coated cars: water simply can’t grip the surface long enough to leave mineral spots.
For a motorhome, the practical payoff shows up fastest if you’re the owner who parks under trees or keeps the van on a driveway with no cover. Sap, bird droppings, and road film release far more easily from a coated panel than a bare one.
- Insects and tar wipe off with a quick rinse instead of a scrub
- Polishing frequency drops because the coating resists oxidation and fading
- UV resistance helps GRP panels keep their colour depth for longer
- A well-maintained coating supports resale value by keeping the gelcoat looking newer than its age
None of this works, though, if the coating goes on over old wax residue, chalky gelcoat, or unpolished swirl marks. The coating locks in whatever condition the surface is in when it’s applied, for better or worse, and a cheap product on poor prep will disappoint within months.
How is ceramic coating applied to a motorhome?
Application on a motorhome takes considerably longer than on a car, largely because there’s so much more surface area and it’s rarely flat. Owner forums back this up repeatedly, noting that a motorhome’s mix of materials and awkward access points make the job slower and often better suited to professional hands than a weekend DIY session, per the Car Care Knowledge Base.
- Decontamination. A thorough wash removes loose grime, followed by an iron fallout remover and a clay bar or clay mitt to strip bonded contaminants the wash missed.
- Correction. Machine polishing tackles oxidation, light scratches, and dull patches; this stage is skipped only if the gelcoat or paint is already in excellent condition.
- Panel-by-panel application. The coating goes on in sections, each left to “flash” before the next begins, which is why a full job can take a full working day or more on larger vehicles, as detailed by Practical Motorhome.
- Curing. The coating needs a dust-free, temperature-controlled environment, which is why professional studios use sheltered bays rather than open forecourts.
Roofs and high panels add another layer of logistics entirely. Reaching them safely usually means proper access equipment, and it’s one of the biggest reasons DIY jobs on A-class motorhomes often stop at the visible bodywork rather than the whole vehicle.
Pro Tip: If you’re doing this yourself, tackle the job in a shaded garage rather than direct sun. Ceramic products flash off far too quickly in heat, leaving high spots and streaking that are a pain to correct afterwards.
How much does motorhome ceramic protection cost?
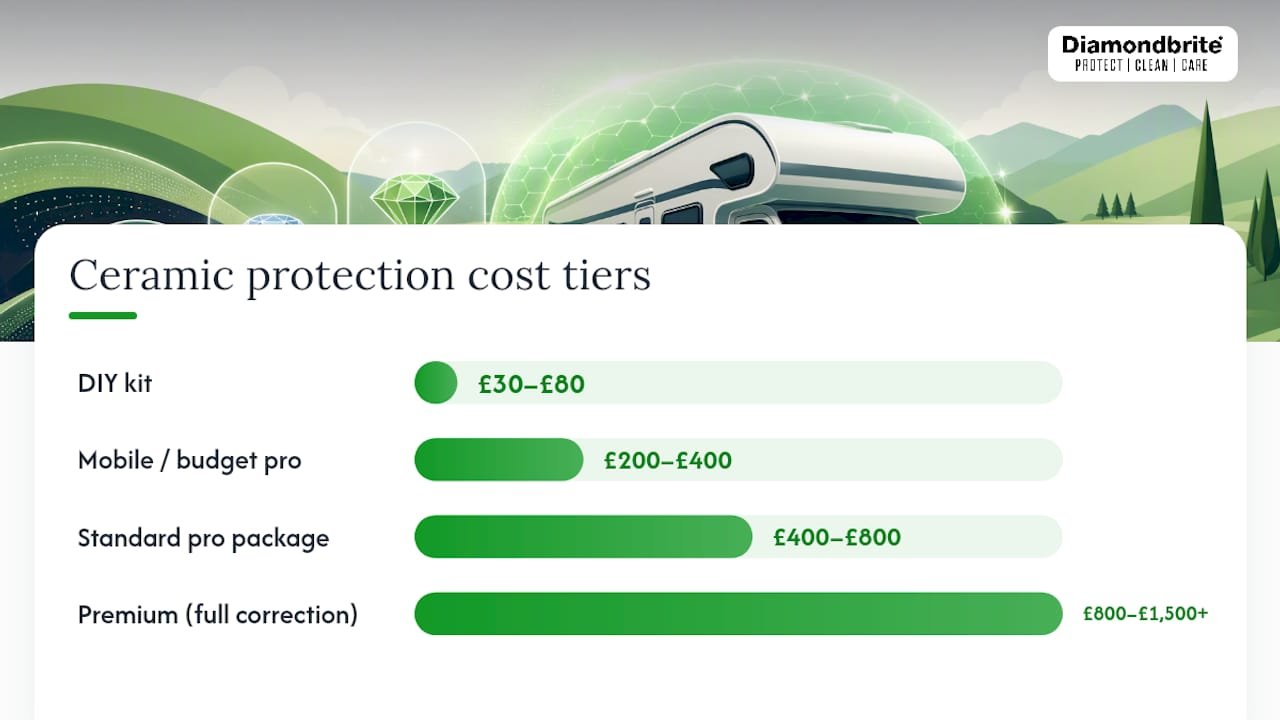
Costs scale with surface area, so what a car detailer charges won’t translate directly to a motorhome. UK pricing typically spans four tiers, and the gap between the cheapest and most thorough options is substantial, according to BC Mobile Valeting.
- DIY kit: roughly £30 to £80, giving months of protection if applied correctly on well-prepped paint
- Mobile or budget professional: roughly £200 to £400, usually a single coating stage with limited correction
- Standard professional package: roughly £400 to £800, including decontamination and moderate machine polishing
- Premium package with full paint correction: £800 to £1,500 or more, delivering multi-year durability
Vehicle size is the biggest cost driver. A panel van conversion costs noticeably less than a coachbuilt with awnings, ladders, and roof furniture to work around. Paint condition matters just as much. A neglected motorhome that needs heavy correction before coating will always cost more than one that’s been kept reasonably clean.
As a rule of thumb, a cheap DIY product is perfectly acceptable if your paint is already in decent shape and you’re happy to reapply every few months. If your time is limited, or the gelcoat has years of oxidation to correct, paying for professional preparation is what actually makes the coating last.
Which motorhome surfaces are safe to coat?
Painted panels and properly prepared gelcoat both take ceramic coatings well. Plastics and trims need different, specialist formulations, since standard paint-grade ceramic products aren’t designed for that substrate, notes the Car Care Knowledge Base.
- Painted coachwork and fibreglass front/rear panels: excellent candidates once polished
- Gelcoat: coats well, but badly oxidised or chalky gelcoat must be polished first, never coated directly
- Acrylic windows: need dedicated plastic-safe products, not standard paintwork ceramic
- Rubber seals and trim: generally best left untouched by ceramic paintwork products
A coating won’t stop stone chips, and it won’t fix a leaking seal or panel delamination. It’s a surface protectant, not a structural fix. There’s also a practical wrinkle worth flagging before you book anything: some owners have found insurers ask about ceramic coatings at renewal, since a coated panel can complicate colour-matching during a respray. It’s worth checking your policy wording, as forum discussions among motorhome owners confirm this catches people out more often than expected.
How do you make a ceramic coating last?
Maintenance is what separates a coating that lasts eighteen months from one that’s gone by spring. A consistent routine using pH-neutral products preserves the bond rather than stripping it, and this alone significantly extends real-world lifespan, according to BC Mobile Valeting.
- Weekly or fortnightly: rinse with a gentle hose or pressure washer before any contact wash to avoid dragging grit across the surface
- Every wash: use a pH-neutral ceramic shampoo rather than a standard supermarket detergent, which can degrade the coating over time
- Annually: carry out a full decontamination pass to lift fallout and mineral deposits before they etch into the coating
- When beading slows down: apply a ceramic top-up spray to refresh hydrophobicity between full reapplications
DIY coatings typically need refreshing every few months; professionally applied ceramic serums, backed by proper correction, can run into years rather than months. Treat reapplication as routine maintenance, not an emergency, and book it in before the old coating has fully broken down.
Pro Tip: Keep a simple diary note of your last decontamination date. Owners who lose track tend to notice their coating “failing” when really it just hasn’t been topped up.
What’s the honest verdict for different motorhome owners?
Weekend tourers with a garage or car port rarely need to spend big. A DIY ceramic product, applied carefully on clean paint, does the job and keeps cleaning quick between trips.
Long-term live-aboards face harsher, more constant exposure, so a professional application followed by disciplined maintenance tends to pay for itself in reduced correction work down the line. Show owners chasing a flawless finish are the ones who genuinely benefit from a premium package with full paint correction, since that’s the only route to multi-year durability and the deepest gloss.
Whichever profile fits you, be wary of dealer up-sell packages sold at handover with vague warranty terms. Owner forums consistently favour either an accredited independent detailer with a clear process, or a trusted DIY product line with a known track record, over an unspecified “protection package” bundled into a finance deal.
— Will
Where to buy Diamondbrite ceramic products for your motorhome
Diamondbrite’s ceramic range covers exactly the two jobs a motorhome owner actually has: protecting the painted coachwork and keeping it clean without constant scrubbing. The Ceramic Shampoo range is formulated to be pH-neutral, so it won’t strip an existing coating between full details, and it’s a straightforward first step even before you commit to a full ceramic application.

If your motorhome has gelcoat sections rather than painted panels, the gelcoat protection guide walks through the substrate-specific approach that standard paintwork products aren’t designed for. Once a coating is on, the maintenance guide sets out the washing and top-up routine that keeps it performing for its full rated lifespan rather than fading after one summer.
Start with the Diamondbrite shop to pick the right product for your panel type, then follow the maintenance schedule so the protection actually lasts as long as it should.
Sources
This guide draws on practical explainers from Practical Motorhome, the Car Care Knowledge Base, BC Mobile Valeting’s UK pricing breakdown, and owner discussions on MotorhomeFun.
- Motorhome paintwork protectors: what you need to know – Practical Motorhome
- Can I put ceramic coating on a caravan? | Car Care Knowledge Base
- Ceramic coating cost UK: Full price breakdown for 2026 | BC Mobile Valeting
FAQ
Is ceramic coating worth it on a motorhome?
For most owners, yes. It reduces cleaning time and slows UV fading, though the benefit depends entirely on correct surface preparation beforehand.
What is the downside of ceramic coating?
It won’t stop stone chips or fix leaks, and it can complicate colour-matching during a respray, which some insurers ask about at renewal.
What is the price of ceramic coating a motorhome?
UK prices range from roughly £30 to £80 for DIY kits up to £1,500 or more for premium professional packages with full paint correction, according to BC Mobile Valeting.
How long does a ceramic coating last on an RV?
DIY products typically need reapplying within months, while professionally applied ceramic serums with proper correction can last several years with regular maintenance.
