

Regular washing paired with a durable polymer sealant or marine-grade ceramic coating is the most effective gelcoat protection you can give your boat. Wax works if you enjoy the routine and don’t mind topping up every couple of months. Ceramic or polymer protection needs proper preparation but rewards you with far less maintenance and a longer-lasting shine.
- Wax: quick, easy, needs reapplying often
- Polymer sealant: mid-range durability, straightforward to apply
- Marine ceramic coating: longest-lasting hydrophobic barrier, but only as good as the prep beneath it
TL;DR:
- Proper surface preparation, including thorough washing, destaining, and decontamination, is essential for any gelcoat protectant to bond effectively.
- Marine-grade ceramic coatings penetrate and bond to the gelcoat, providing a hydrophobic barrier that lasts over a year, especially on boats exposed to daily salt and UV.
- Wax needs reapplication every two to four months and offers limited durability, making it more suitable for covered or infrequently used boats.
- Polymer sealants last longer than wax, typically several months, and are a good middle-ground option requiring minimal effort for improved protection.
- Over-using compounding or buffing depletes gelcoat thickness; a preventive approach with high-quality protection reduces the need for costly restorations.
Table of Contents
- Why gelcoat protection matters and what damages it
- Surface preparation: the essential wash, destain and decontamination steps
- Protectant options compared: wax, polymer sealant and ceramic coatings
- How do you apply gelcoat protection correctly?
- Maintenance schedule and troubleshooting common failures
- Why ceramic-infused protection preserves gelcoat longer
- Comparing the cost and effort of each protection method
- What the conventional advice on gelcoat gets wrong
- Key Takeaways
- Sources
- FAQ
Why gelcoat protection matters and what damages it
Gelcoat isn’t paint. It’s the resin-rich outer skin that seals your hull’s laminate from the water, salt and UV that would otherwise attack the fibreglass beneath it. Once that barrier weakens, you’re not just dealing with a dull finish. You’re exposing structural material to moisture.
Three things wear gelcoat down: constant UV exposure breaks down the resin’s surface molecules, salt crystallises into microscopic pores and holds moisture against the surface, and oxidation turns a glossy hull chalky and porous. Left unchecked, porous gelcoat lets water migrate deeper, raising the risk of osmosis blistering.
There’s also what we’d call your polishing budget. Every time you compound or buff gelcoat, you remove a microscopic layer of it. Do that every season for a decade and you’ve measurably thinned your protective layer. Chalky residue on your hand after wiping, a faded finish, and water that no longer beads are your cues that protection has run out.
Surface preparation: the essential wash, destain and decontamination steps
No protectant bonds properly to a dirty or oxidised surface. Gelcoat that’s overcoated while porous or contaminated simply fails to hold, so preparation isn’t optional groundwork. It’s the part of the job that decides whether your protection lasts three months or three years.
- Wash with a two-bucket method using a pH-neutral marine soap, rinsing thoroughly between panels to avoid dragging grit across the surface.
- Spot-treat stubborn stains with an oxalic acid destainer, following the product’s contact time and rinsing promptly. It lifts most surface staining, though it won’t reverse genuine UV discolouration.
- Run a decontamination clay bar over the hull to pull out bonded contaminants like tar and industrial fallout that washing alone won’t shift.
- Assess oxidation. Light chalkiness needs nothing more than a gentle cleaner-polish. Moderate to severe oxidation may call for compounding, reserved as a last resort, rather than a routine step.
Pro Tip: Test destainers on a hidden patch first, and never exceed the manufacturer’s stated contact time. Oxalic acid left too long can etch the gelcoat rather than clean it.
Stick to the least-abrasive method that gets the job done. Reach for compounding only when a milder approach genuinely won’t cut it.
Protectant options compared: wax, polymer sealant and ceramic coatings
Once your hull is clean and destained, the real decision is which protectant suits your boat, your climate and how much maintenance you’re willing to do.
Wax gives you the fastest route to a glossy finish. It’s forgiving to apply, works well over freshly polished gelcoat, and needs little specialist knowledge. The catch is longevity: carnauba and synthetic waxes typically need reapplying every few months, sooner if your boat sits in strong sun or salt spray most of the season.
Polymer sealants sit a rung up. They bond more tightly to gelcoat than wax, offer stronger UV resistance, and generally hold up for several months at a stretch. Application is still DIY-friendly with spray or paste formulas, making sealants a sensible middle ground for owners who want more than wax but aren’t ready for a full ceramic system.
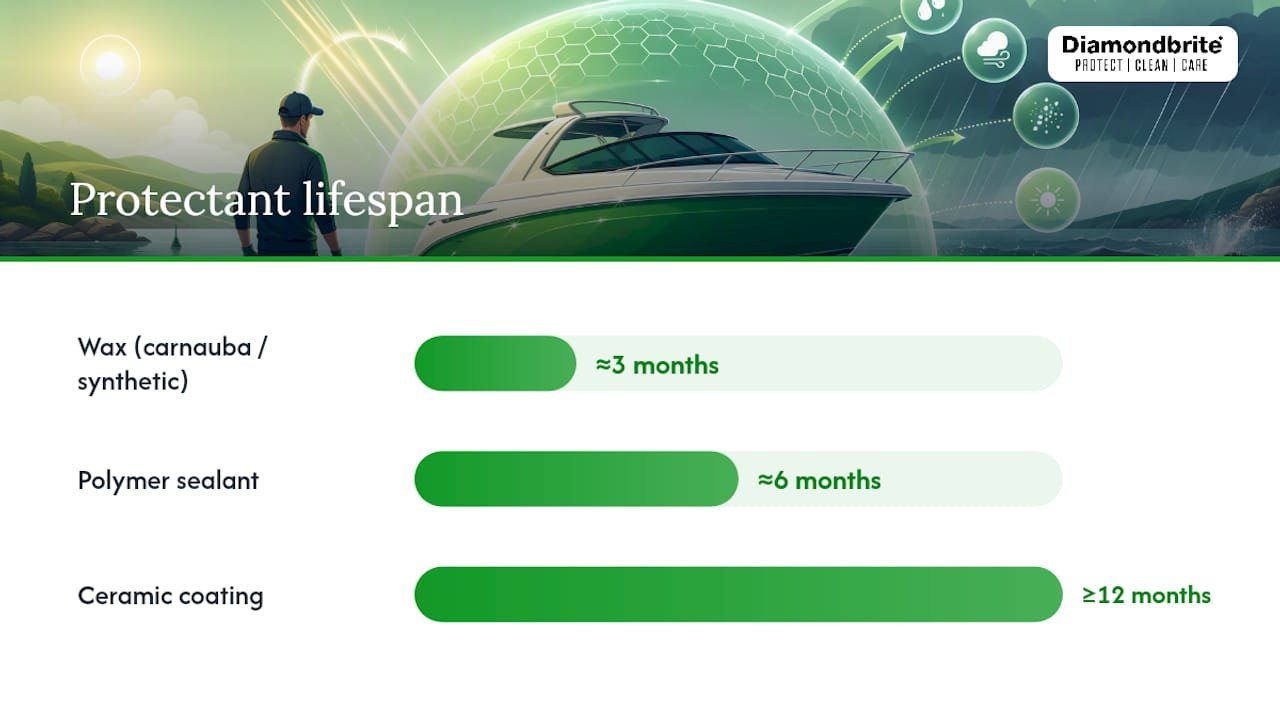
Ceramic coatings are where preventive protection earns its keep. Marine-grade ceramic and polymer-ceramic products can protect for a year or longer with correct application, building a genuinely hydrophobic surface that sheds water, salt and grime far more readily than wax ever will. The trade-off is preparation. Ceramic chemistry bonds to the gelcoat itself, so any contamination or residual oxidation left underneath gets locked in rather than protected over.
A few situations call for layering:
- A sealant applied on top of an existing wax base, useful as a stopgap between full details.
- A ceramic topcoat applied over correctly compounded and decontaminated gelcoat, which is the combination that gives the longest interval between major maintenance sessions.
- Wax alone on boats kept undercover or used only occasionally, where UV and salt exposure are naturally lower.
How do you apply gelcoat protection correctly?
Whichever protectant you choose, the sequence matters more than the product itself.
- Prep first, always. Wash, destain, clay and dry the hull completely. A wet or contaminated surface undermines every product that follows.
- Apply wax in thin, even coats, buffing off haze after 10 to 15 minutes. A second coat 24 hours later noticeably extends durability on exposed hulls.
- Spread polymer sealant in small sections using an applicator pad or spray format, following the manufacturer’s cure window, usually 20 to 30 minutes, before buffing to a finish.
- Follow ceramic application protocols strictly: wipe on in a controlled pattern, remove excess within the stated window, and leave the coating undisturbed through its full cure period, often 12 to 24 hours before the first wash.
- Verify the result with a water-bead test. Water that beads tightly and rolls off confirms the protectant has bonded; flat sheeting water means another pass is needed.
Marine ceramic systems that cure correctly reduce how often you need to wax between details, which is precisely why the extra care at application stage pays for itself later. Avoid polishing a freshly cured ceramic coating unless the manufacturer specifically says it’s safe to do so.
Maintenance schedule and troubleshooting common failures
A short, consistent routine beats an occasional deep restoration every time.
- Rinse and wash every one to two weeks in saltwater conditions, and monthly if your boat stays in fresh water or under cover.
- Run a water-bead check each month. Beading tells you protection is intact; sheeting tells you it’s time to reapply.
- Reapply wax every two to four months, polymer sealant every few months, and marine ceramic coatings roughly once a year, adjusting sooner for uncovered boats in harsh sun or heavy salt exposure.
- Streaking or dulling gloss usually means product build-up rather than failure. A gentle pH-neutral wash often resolves it before you reach for anything abrasive.
- Early oxidation calls for a light polish, not a full compound. Save wet sanding and heavy correction for genuinely severe cases, and hand those over to a professional.
- Blisters, deep crazing, or any sign the gelcoat has cracked through to the laminate are structural warning signs. Stop, and get a marine surveyor or professional detailer to assess it before applying any protectant.
Why ceramic-infused protection preserves gelcoat longer
Diamondbrite has spent over three decades formulating ceramic-infused protection in its Loughborough lab, and the marine range applies that same chemistry to hulls that face relentless UV and salt exposure. Ceramic coatings create a genuinely hydrophobic barrier that reduces how often you need to reapply protection, which matters more than it sounds. Fewer reapplications mean fewer polishing sessions, and fewer polishing sessions mean you keep more of your original gelcoat thickness intact.
That doesn’t make wax pointless. If your boat spends most of its life covered or trailered, a seasonal wax routine is perfectly sensible and far less demanding than a full ceramic prep. Ceramic protection earns its place when your hull is moored, exposed to salt daily, or when you’re simply tired of compounding every spring.
Comparing the cost and effort of each protection method
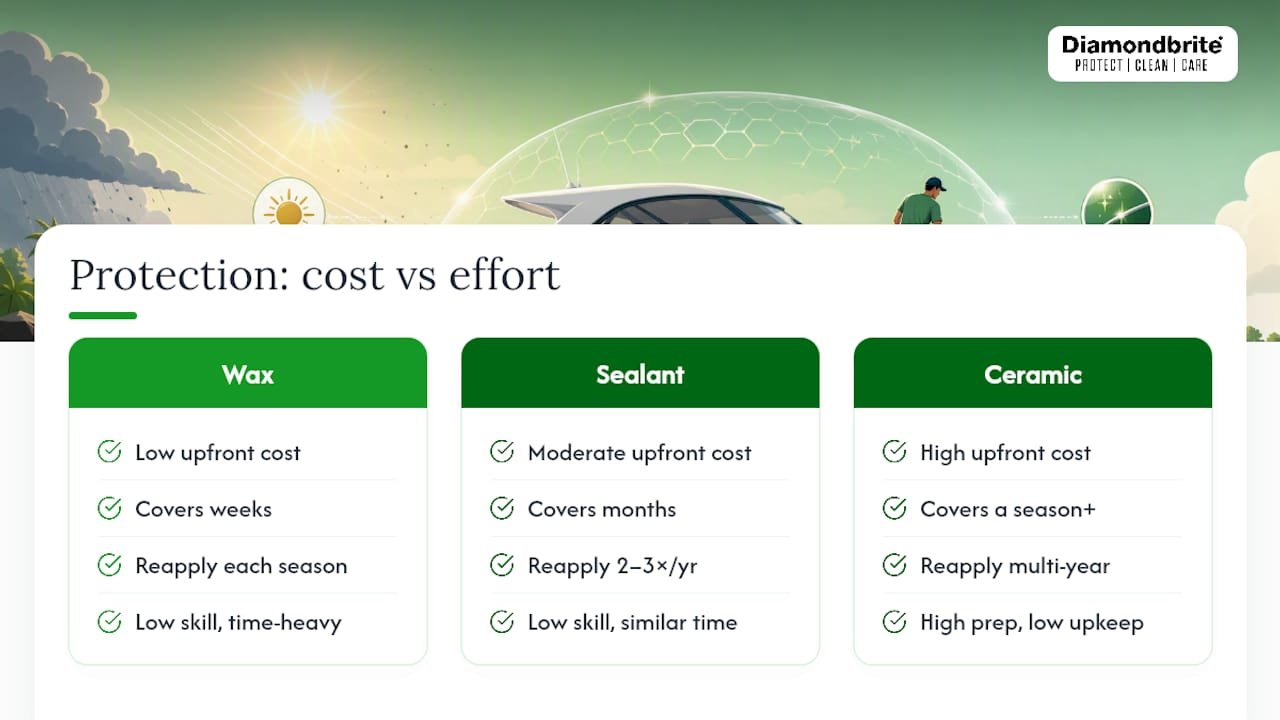
Wax sits at the low end of both cost and commitment. A bottle of quality marine wax runs a modest sum, application takes an afternoon, and you’ll be back doing it again within a season. Over several years, though, the repeated buying and buffing adds up in both money and elbow grease, even before you count the gelcoat thickness lost to each round of polishing beforehand.
Polymer sealants cost a little more per application but stretch that spend across several months rather than weeks. For an owner who details their own boat two or three times a year, sealant often works out cheaper per month of protection than wax, while demanding roughly the same DIY skill level.
Marine ceramic coatings carry the highest upfront cost and the most demanding prep. That investment buys you a full season, sometimes longer, of hydrophobic protection without needing to touch the hull beyond routine washing. Measured per month of coverage rather than per bottle, ceramic protection is often the most economical option over a two or three year window, and it’s the only one of the three that meaningfully reduces how much gelcoat you sand or compound away in the process.
The honest trade-off is time versus money. Wax costs less upfront but eats your weekends repeatedly. Ceramic costs more at the outset but gives your Saturdays back for the rest of the season.
What the conventional advice on gelcoat gets wrong
Most guides treat gelcoat maintenance as a restoration problem: let it oxidise, then compound it back to life. That’s backwards. Every compounding session is a withdrawal from a finite balance of gelcoat thickness, and the industry rarely says so plainly.
The better mindset is prevention. A hull kept sealed with a decent polymer or ceramic layer rarely needs aggressive correction in the first place, which means you’re not spending your gelcoat’s lifespan to fix a problem that proper protection would have avoided. Marine detailers increasingly favour the least abrasive method possible for exactly this reason, and a well-prepped ceramic layer over correctly compounded gelcoat is what actually delivers on that principle rather than just repeating it as advice.
Where I’d push back on the standard checklist is the assumption that wax is the safe, low-risk default. It isn’t risk-free. It’s low-commitment protection that leaves your hull exposed for longer stretches between applications than most owners realise. If you’re serious about preserving gelcoat rather than just making it shine for a weekend, prioritise preparation quality over product choice. A brilliant ceramic coating over a poorly cleaned hull will fail faster than a mediocre wax over a properly prepped one.
— Will
Where to start with Diamondbrite’s marine protection range
Diamondbrite’s ceramic-infused formulations, built in the same Loughborough lab that’s protected over two million vehicles, extend naturally to the marine hulls facing the same UV and salt punishment as a daily-driven car. If you want the hydrophobic, long-cycle protection this article recommends without guessing at compatible products, start with guidance on keeping a ceramic coating performing at its best, which covers the same wash cadence and inspection habits that apply to a hull. For the actual prep and polish stage before any ceramic topcoat, check whether polishing first is the right call for your surface before committing product to gelcoat. When you’re ready to buy, browse the full range at the Diamondbrite shop and pick the ceramic system that matches how much of the season your boat spends in the water.
Key Takeaways
Preventive gelcoat protection, built on thorough surface preparation and a durable sealant or marine ceramic coating, preserves more gelcoat material over time than repeated corrective compounding.
| Point | Details |
|---|---|
| Prep decides everything | Wash, destain and decontaminate before any protectant, since contaminated gelcoat won’t hold a bond. |
| Choose by exposure, not habit | Wax suits covered or occasional boats; ceramic suits hulls facing daily salt and UV. |
| Respect the polishing budget | Compound only when needed. Every pass removes gelcoat you can’t get back. |
| Reapply on schedule | Wax every 2 to 4 months, sealant every few months, marine ceramic around once a year. |
| Diamondbrite for long-cycle protection | Its ceramic-infused marine formulations reduce reapplication frequency and help preserve gelcoat thickness over seasons. |
Sources
For deeper detail on gelcoat repair and restoration, see the Tricel Composites gelcoat repair guide, Practical Sailor’s maintenance tips, and The Yacht Maintenance Hub’s oxidation guide.
- Tricel composites — gelcoat repair guide
- The Yacht Maintenance Hub — gelcoat oxidation
- Boat Genesis — how to protect fiberglass boat from UV damage
FAQ
How do you protect gelcoat effectively?
Wash regularly with a pH-neutral marine soap, then apply a polymer sealant or marine ceramic coating after full decontamination. Proper preparation determines whether the protectant bonds at all.
What’s the best way to restore faded or oxidised gelcoat?
Start with a gentle cleaner-polish for light chalkiness, and reserve chemical oxidation removers or compounding for moderate to severe cases. Wet sanding should be left to professionals since it permanently removes material.
How long does gelcoat last on a boat?
Well-applied gelcoat can last 10 to 15 years, though exposure, maintenance quality and how often it’s compounded all affect that lifespan significantly.
What won’t gelcoat protectants stick to?
Any porous, contaminated, waxy or oxidised surface will stop a sealant or ceramic coating from bonding properly, which is why decontamination and destaining always come before protection, not after.
How often should marine ceramic coating be reapplied?
Marine-grade ceramic coatings typically last 12 months or longer with correct application, though uncovered boats in harsh sun or heavy saltwater exposure may need touch-ups sooner.
